Discover the perfect space-saving solution with a metal loft bed featuring an integrated desk․ This versatile furniture combines functionality and durability, offering a comfortable sleeping area and a dedicated workspace․ Ideal for small rooms, it maximizes vertical space while maintaining a sleek, modern design․ Follow this guide to assemble your metal loft bed with desk efficiently and safely․
What is a Metal Loft Bed with Desk?
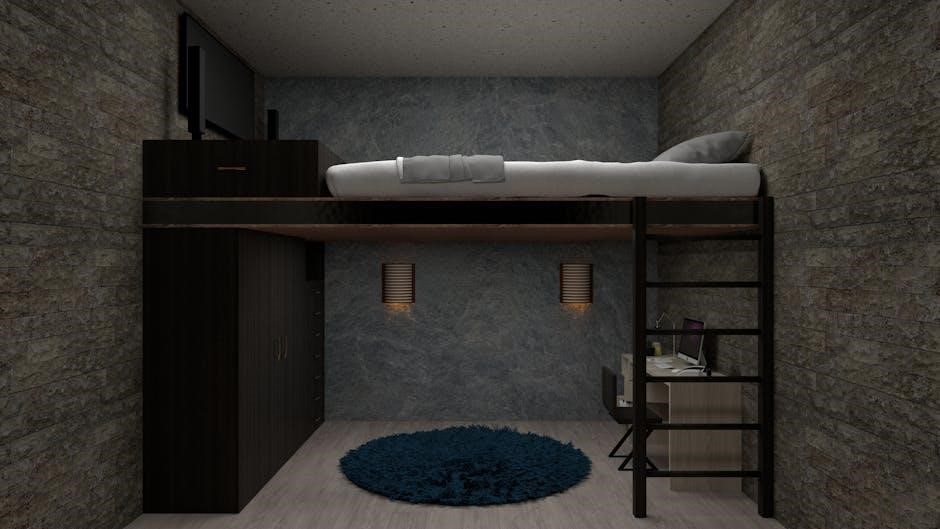
A metal loft bed with desk is a multi-functional furniture piece designed to optimize space․ It combines a elevated bed frame with a built-in desk underneath, perfect for small rooms․ Made from durable metal, it offers a sturdy and long-lasting structure․ The loft bed features a raised sleeping area, while the desk provides a dedicated workspace for studying, working, or using a computer․ This design is ideal for maximizing vertical space, making it a popular choice for dormitories, apartments, or home offices․ Many models include additional features like built-in shelves, drawers, or storage compartments․ Its sleek and modern design suits various interior styles, offering both functionality and aesthetic appeal․ This space-saving solution is perfect for those needing a comfortable and efficient living or working environment․
Benefits of a Metal Loft Bed with Desk
A metal loft bed with desk offers numerous benefits, primarily space efficiency, making it ideal for small rooms․ Its elevated design maximizes vertical space, leaving the floor area open for other uses․ The metal frame ensures durability and stability, supporting more weight compared to wooden alternatives․ It is cost-effective, combining a bed and workspace in one unit, reducing the need for separate purchases․ The sleek, modern aesthetics enhance room decor, appealing to those valuing style․ Low maintenance and resistance to pests add to its practicality․ Additionally, it provides a quiet sleeping environment due to minimal creaking․ Customization options allow for personal touches, and its ease of assembly makes it a DIY-friendly choice․ Safety features like sturdy railings ensure stability, and its recyclable nature supports eco-friendly preferences․ Overall, it is a versatile, efficient, and stylish solution for optimizing living spaces․

Preparation for Assembly
Before starting, gather all tools, materials, and instructions․ Ensure a clean, flat workspace and read through the manual to understand the process and safety guidelines․
Tools and Materials Needed
To successfully assemble your metal loft bed with desk, gather the necessary tools and materials․ Essential tools include an Allen wrench (provided), a screwdriver (both Phillips and flathead), a wrench for bolts, and a rubber mallet for tapping parts into place․ Ensure all screws, bolts, and nuts are included in the packaging․ Additional materials like a step ladder, clamps for holding parts steady, and a measuring tape can be helpful․ Organize components according to the instruction manual to avoid confusion․ Double-check for any missing or damaged parts before starting․ Having a clean, stable workspace and proper lighting will also aid in the assembly process․ Optional tools, such as a power drill, may speed up the process but are not always required․
Workspace Setup and Safety Precautions
Before starting the assembly, ensure your workspace is clean, dry, and flat․ Choose a spacious area to accommodate the bed and desk components․ Protect your floor with a drop cloth or old sheets to prevent damage․ Good lighting is essential to avoid accidents and ensure clarity․ Wear safety gloves and safety glasses to protect yourself from sharp edges or flying debris․ Keep children and pets away from the assembly area․ Double-check that all parts are organized and within reach․ Familiarize yourself with the tools and materials to streamline the process․ Ensure proper ventilation and avoid overexertion when lifting heavy components․ A first aid kit should be nearby in case of emergencies․ Always follow safety guidelines to ensure a smooth and injury-free assembly experience․
Understanding the Assembly Instructions
Understanding the assembly instructions is key to a smooth process․ Clear steps ensure accuracy, helping you navigate the metal loft bed with desk assembly efficiently․
Overview of the Assembly Process
The assembly process for a metal loft bed with desk involves several structured steps to ensure stability and functionality․ It begins with unpacking and organizing all components, followed by constructing the bed frame and attaching the desk․ Crossbars and stabilizers are added to enhance structural integrity․ Each step requires careful alignment and secure fastening of bolts and screws․ The process also involves verifying the manufacturer’s instructions to avoid errors․ Safety precautions, such as ensuring a stable workspace and avoiding over-tightening, are essential throughout․ Once completed, the loft bed and desk should be tested for stability and weight capacity compliance․ Proper assembly ensures a durable and safe space-saving solution for any room․
Importance of Following the Manufacturer’s Instructions
Following the manufacturer’s instructions is crucial for ensuring the safe and correct assembly of your metal loft bed with desk․ Deviating from the guidelines can lead to structural instability, safety hazards, and potential damage to the components․ The instructions are tailored to the specific design of the bed and desk, providing step-by-step clarity to avoid confusion․ Proper assembly ensures the bed meets weight capacity requirements and remains stable under normal use․ Ignoring the instructions can result in uneven surfaces, wobbling, or even collapse․ By adhering to the provided directions, you can achieve a sturdy, functional, and long-lasting piece of furniture that enhances your living or working space․

Assembling the Metal Loft Bed Frame
Begin by assembling the frame’s legs and support beams, ensuring all bolts are securely tightened․ Attach the side rails and crossbars for stability and durability․ Follow the manufacturer’s instructions carefully to ensure proper alignment and weight capacity compliance, guaranteeing a safe and sturdy structure for the loft bed․
Unpacking and Organizing the Components
Start by carefully unpacking all components from the boxes․ Verify each item against the inventory list provided in the instructions to ensure nothing is missing․ Separate the hardware, such as bolts, screws, and Allen wrenches, and store them in a designated container for easy access․ Label or group the metal frame parts, including legs, side rails, and support beams, to avoid confusion during assembly․ Clear a large, flat workspace to organize the components neatly․ Refer to the manufacturer’s diagrams to identify each part visually․ Double-check for any damage or defects before proceeding․ Organizing your components early will streamline the assembly process and minimize delays․
Step-by-Step Frame Assembly
Begin by attaching the legs to the metal frame using the provided bolts and washers․ Ensure they are tightly secured with an Allen wrench․ Next, align the side rails with the frame and screw them into place, verifying proper alignment․ Connect the support beams to the side rails to add stability․ Use the diagram to identify the correct placement of each beam․ Tighten all connections firmly․ If your model includes crossbars, attach them between the side rails to reinforce the frame․ Double-check that all bolts are snug and the frame is level․ Refer to the manufacturer’s instructions for specific torque requirements․ Once the frame is stable, proceed to attach the desk component as outlined in the next section․

Attaching the Desk to the Loft Bed
Securely integrate the desk with the bed frame using the provided brackets or screws․ Ensure proper alignment and stability before tightening all connections for a sturdy fit․
Aligning the Desk with the Bed Frame
Proper alignment is crucial for a stable and functional setup․ Begin by placing the desk near the bed frame, ensuring it matches the pre-drilled holes or attachment points․ Measure the width of the bed frame and compare it to the desk’s mounting brackets to ensure a precise fit․ Use a level to confirm the desk is even and aligned symmetrically with the bed․ If the desk has adjustable brackets, position them to fit snugly against the bed’s side rails․ Tighten the screws or bolts incrementally to maintain balance and avoid misalignment․ Double-check the manufacturer’s instructions for specific alignment recommendations, as designs may vary․ Once aligned, secure the desk firmly to the bed frame for optimal stability and safety․
Securing the Desk to the Loft Bed
After aligning the desk with the bed frame, the next step is to securely fasten them together․ Locate the attachment points on the desk and bed frame, typically metal brackets or clamps․ Use the provided screws or bolts to connect these points, ensuring they are tightly secured․ Start by loosely attaching the desk to the bed frame, then tighten all screws evenly to avoid misalignment․ If the desk feels unstable, consider adding support brackets or crossbars for extra stability․ Once everything is in place, double-check the manufacturer’s weight capacity to ensure the setup is safe and functional․ Finally, test the stability by gently rocking the desk to confirm it is firmly attached to the bed frame․
Installing Support Structures
Install crossbars and stabilizers to enhance the structural integrity of the loft bed and desk setup․ These components add strength and prevent wobbling, ensuring long-term durability and safety․
Adding Crossbars and Stabilizers
Begin by identifying the crossbars and stabilizers from the hardware kit․ These components are essential for reinforcing the bed frame and desk structure․ Start by attaching the crossbars between the side rails of the bed frame using the provided bolts․ Ensure they are tightly secured to prevent any movement․ Next, install the stabilizers at the corners where the desk meets the bed frame․ These will add extra rigidity and prevent the desk from shifting․ Use a wrench to tighten all connections firmly․ Make sure all parts are aligned properly and the structure feels sturdy before proceeding․ Double-check the manufacturer’s instructions for specific placement and torque requirements․
Ensuring Structural Integrity
After assembling the frame and attaching the desk, inspect all connections to ensure they are secure․ Tighten any loose bolts or screws, as these can compromise the stability of the structure․ Check the alignment of the crossbars and stabilizers to confirm they are properly seated and evenly distributed․ Test the bed and desk by gently applying weight to different areas to ensure there is no wobbling or flexing․ If any instability is detected, revisit the assembly steps to identify and correct the issue․ A sturdy structure is crucial for safety and long-term durability․ Ensure all weight is evenly distributed and the bed and desk meet the manufacturer’s weight capacity guidelines․

Finalizing the Assembly
Tighten all bolts and screws to ensure stability․ Test the loft bed and desk by applying gentle pressure to confirm sturdiness; Ensure all parts are securely fastened for safe use․
Tightening All Bolts and Screws
Once all components are in place, systematically tighten every bolt and screw․ Start from the bed frame, ensuring all joints are secure․ Use an Allen wrench or screwdriver as specified in the instructions․ Pay special attention to the desk attachment points to prevent any wobbling․ Double-check the manufacturer’s torque specifications to avoid overtightening, which could damage the metal․ After tightening, perform a final inspection to ensure no parts are loose․ This step is crucial for the stability and longevity of the metal loft bed with desk․ A well-tightened structure ensures safety and prevents potential issues during use․ Always refer to the provided manual for specific tightening sequences and guidelines․
Testing the Stability of the Loft Bed and Desk
After completing the assembly, thoroughly test the stability of the metal loft bed and desk․ Start by gently rocking the structure from side to side and front to back to ensure there is no wobbling․ Apply moderate weight to the desk surface and climb onto the bed to check for any movement or creaking․ Use a spirit level to verify that the desk and bed are properly aligned and even․ Address any instability by tightening loose bolts or screws․ If the issue persists, check for uneven flooring or consider adding additional support․ Ensure the structure is stable before regular use to guarantee safety and durability․ A stable loft bed and desk provide a reliable workspace and sleeping area․
Troubleshooting Common Issues
Identify and address common assembly issues like missing parts, uneven structures, or loose connections․ Refer to the manual or manufacturer support for solutions and adjustments․
Identifying Missing or Damaged Parts
Before starting assembly, thoroughly inspect all components for completeness and damage․ Cross-reference each item with the parts list in the manual to ensure nothing is missing․ Look for dents, scratches, or bends in metal frames, as these can affect stability․ If a part is damaged or missing, contact the manufacturer or supplier immediately․ Using compromised parts can lead to structural instability and safety risks․ Keep the original packaging handy for reference and returns․ If unsure about the condition of any component, document it with photos and seek clarification․ Addressing these issues early ensures a smooth assembly process and prevents future complications․ Always prioritize quality and completeness for a secure and durable setup․
Fixing Uneven or Wobbly Structures
If your metal loft bed or desk feels uneven or wobbly during or after assembly, address the issue promptly to ensure stability and safety․ Check if the floor is level and use shims or adjustable feet to balance the structure; Tighten all bolts and screws, as loose connections often cause wobbling․ Inspect the frame for misaligned parts and reassemble if necessary․ For added stability, consider adding crossbars or support brackets․ If the issue persists, verify that all pieces are correctly attached according to the manufacturer’s instructions․ Regularly inspect and tighten hardware to prevent future instability․ Ensuring a sturdy setup is crucial for both functionality and safety, especially for elevated structures like loft beds․
Safety Measures and Maintenance
Ensure the loft bed’s structural integrity by adhering to weight capacity guidelines․ Regularly inspect for loose bolts and clean dust buildup․ Follow safety rules to prevent accidents․
Regular Inspection and Maintenance Tips
Regularly inspect the metal loft bed and desk for any signs of wear or damage․ Check all bolts and screws to ensure they are tightly secured․ Clean dust and dirt from the frame to prevent rust․ Inspect the desk’s attachment points for stability․ Ensure the ladder is firmly attached and free from damage․ Replace any worn-out parts immediately․ Lubricate moving parts like hinges to maintain smooth operation․ For added safety, test the bed’s weight capacity periodically․ Schedule inspections every 6 months to maintain structural integrity․ Keep the desk surface clean and dry to avoid water damage․ Follow these tips to extend the lifespan of your metal loft bed and desk․
Weight Capacity and Safety Guidelines
Always adhere to the manufacturer’s specified weight capacity for your metal loft bed with desk to ensure safety and prevent structural damage․ Typically, the weight limit includes both the user and any additional items like bedding or desk accessories․ Ensure the bed is placed on a level, stable surface to prevent tipping․ Secure the bed frame to the wall using anti-tip brackets for added stability․ Avoid overloading the desk with heavy objects, as this can compromise the bed’s structural integrity․ Regularly inspect for signs of wear or damage that could affect weight distribution․ Follow all safety guidelines to create a secure and functional space for sleeping and working․
Customization and Upgrades
Elevate your metal loft bed with desk by adding personalized touches, such as paint, decals, or custom lighting; Incorporate shelves, drawers, or baskets for extra storage and functionality․
Adding Storage or Decorative Elements
Enhance your metal loft bed with desk by incorporating storage solutions or decorative accents․ Install shelves, drawers, or baskets under the desk or bed for organization․ Add decorative elements like fairy lights, wall art, or plants to personalize the space․ Consider attaching a pegboard or hooks for hanging items․ For functionality, add a sliding drawer or storage bins․ Ensure any additions align with the bed’s weight capacity․ Use paint or decals to match your room’s aesthetic․ These upgrades not only improve functionality but also reflect your personal style, creating a cohesive and inviting environment․
Personalizing the Loft Bed and Desk
Personalizing your metal loft bed and desk allows you to create a unique and functional space that reflects your style․ Consider adding a fresh coat of paint or vibrant decals to both the bed and desk for a personalized touch․ Incorporate cushions, rugs, and fairy lights to enhance comfort and ambiance․ For added functionality, attach organizers like trays or hooks to keep essentials within reach․ These custom elements not only make the space feel more inviting but also allow you to express your creativity and preferences, ensuring the loft bed and desk blend seamlessly with your room’s decor․
With careful planning and execution, your metal loft bed with desk is now fully assembled․ Enjoy the functionality and space-saving benefits of your new setup, knowing you’ve accomplished it successfully․
Final Thoughts on Assembly and Usage
Assembling a metal loft bed with a desk can be a rewarding DIY project, offering both functionality and style․ By following the instructions carefully and taking necessary safety precautions, you can ensure a sturdy and reliable setup․ The combination of a loft bed and desk maximizes space, making it ideal for small rooms or shared areas․ Regular maintenance, such as tightening bolts and inspecting for wear, will extend the lifespan of the structure․ Proper weight distribution and adherence to the manufacturer’s guidelines are crucial for safety․ Once assembled, the loft bed and desk provide a comfortable sleeping area and a practical workspace, enhancing productivity and organization in your home․
Comments